• About
  • Contact
  • Advertise
  • Privacy Policy
  • Copyright & Disclosure
  • Subscribe
    • Bloglovin
    • Facebook
    • Instagram
    • Pinterest
    • YouTube

Life at Cloverhill

  • Main
  • Home & Garden
    • Cloverhill Farmhouse
    • January Declutter Detox
    • Cleaning & Organizing
    • Gardening
    • Our Backyard Chickens
    • Previous Apartments
  • Holidays
    • FREE Online Christmas Planner
    • Holiday Decor
    • Holiday Recipes
    • Holiday Projects
    • Holiday Gift Ideas
    • Holiday Organizing
    • Holiday Activities
  • Recipes
  • Create
    • Printables Vault
    • Everyday Projects
    • Seasonal Projects
  • Family
    • Baby
    • I Do
    • Travel

Apartment Decor

Little Home Office Update

While I was off for my surgery, I spent plenty of time in this little apartment of ours, thinking about what works and what doesn’t. It’s hard when you’re in this renter’s limbo. We know we want to buy a house soon, but for now we’re making do with what we have in this space. I don’t like the idea of putting much work into it when we never know how much longer we’ll be here…but there is one space that was really starting to get on my nerves…my little home office.

Back when we first moved into our apartment, I put together this little space in the corner of our dining room. I needed it for my part time evening job, working on the blog and keeping up with the regular day-to-day paperwork. It was tight, but I made the most of it and Garrett helped me put up shelves above for more storage. The plastic drawer unit was from my old university dorm room and the desk was a $40 IKEA find that I’d bought for the Toronto apartment. Over time, everything was looking a little run down. The desk was chipping, two drawers were cracked and it just wasn’t the look I was going for.

This is a quick rough photoshop I put together one day to explain my vision to Garrett. I took some inspiration from my Office Space & Craft Room board on Pinterest.

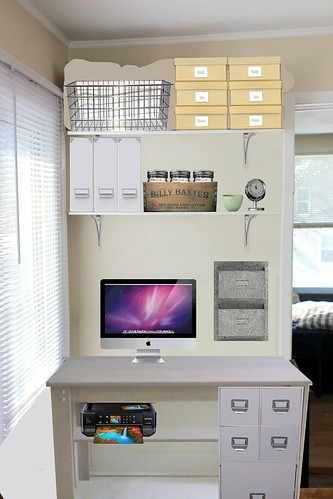
For the new desk, the original plan was to use wood leftover from the DIY Window Seat Storage Bench to make a whitewash/grey desktop, add legs on the left side and then use stacked organizer cubes for the right side. There was even the idea of making a shelf below for the printer. We measured the wood and started drawing up plans when we decided to make a Target run while out running errands.


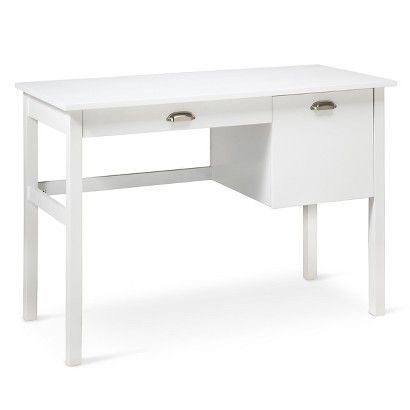
While we were there, it made sense to look at a few desk designs to see some different style ideas. That’s when we spotted this Threshold desk. Originally $150, it was part of the liquidation sales at Target in Canada right now…and we were able to get it for less than $115. Considering that we didn’t have to take a weekend to build it (besides the hour it took to put it together), there was no painting involved and we could have it set up right away – we bought it on the spot. Normally, Garrett and I are both planners. If we know we’re going to buy something, we research it, talk about it, look up alternatives, etc. This is one of the few times where we just said “yes” right then and there.

The big selling points for me:

  1. Filing cabinet – I love to have all my most used files at the ready, and this was going to make that easier than ever.
  2. One large surface – the older desk was small, with extra space from the drawers on the side, but I could never use this space. Now I have lots of space to work on.
  3. Slim front drawer – I hadn’t included this in the original drawings for the desk we were going to make, but now that I have this, I love it. It’s so handy to have the things I use the most right there.

While we were there, I also picked up a couple of little bowls to hold USB drives and paperclips, and a vase for flowers too. I’m still working on styling the shelves in a way that also makes them really efficient.

This week I went to IKEA to get a few things too. My part time job requires me to send out packages on a regular basis, and I got tired seeing stacks of big ugly yellow envelopes stacked on the shelves. These new magazine files are perfect for hiding the envelopes, but keeping them at arm’s reach.

I still need to figure out a chair solution as well. I’ve been using this old chair, that I recovered the bottom of back in 2011, but since then the back is falling apart too. Do I just find new fabric and recover it? Replace it?

I can’t believe how much of a difference having a white desk is making in that small space. It makes the whole dining room feel bigger! It also encourages me to keep the space clean and tidy – and I’ll take any motivation that I can get. The space is slowly starting to come together, but once it’s done I’ll be sure to share it.

Share this:

  • Click to share on Pinterest (Opens in new window) Pinterest
  • Click to share on X (Opens in new window) X
  • Click to share on Facebook (Opens in new window) Facebook
  • Click to email a link to a friend (Opens in new window) Email

Related


« Lately – PaintNite, IKEA, 2048 & Organizing my iPhone
Friday Favourites – National Home Show »
Hi, I'm Amanda! Join me as I make my family's 1903 farmhouse into a home. I share renovations, DIY projects, recipes, our flower farm and the joy of living in the Canadian countryside
More About Me

Archives

Categories

Copyright © 2025 · Divine theme by Restored 316

Copyright © 2025 · Divine Theme on Genesis Framework · WordPress · Log in