It’s been a while since I last shared anything about our 1903 farmhouse kitchen renovation — and for good reason. Somewhere between countertop samples, cabinet hardware decisions, and a very dusty house…we welcomed baby number four! He’s five months old now, and I’m finally coming up for air long enough to start catching up on these long-overdue renovation updates.

If you’ve been following along, you might remember the before photos of our well-loved but disfunctional kitchen, the plans we made for transforming it, and the prep work that kicked everything off. Well, I’m thrilled to share the next big milestone we reached — cabinetry installation!
Even though this stage happened months ago, it still feels exciting to look back and see how far the space came during that time.
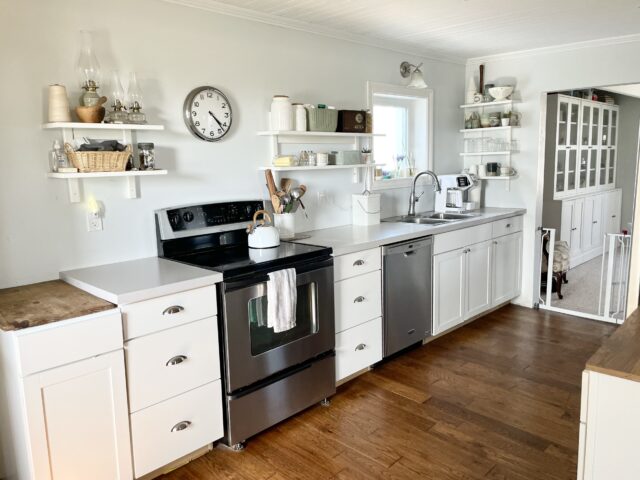
We worked with the family team at Georgina Kitchens to take the visions I had for our cabinetry and bring it to life. They were very knowledgable about the logistics of putting a newer custom kitchen into a 122-year-old house with lots of quirks.
The Custom Range Hood
One of the most exciting parts of the cabinetry install was seeing the custom range hood take shape. It was something I had dreamed up early in the design process — classic, simple lines that fit the character of our old farmhouse, but with just enough detail to feel special.

Once it went in, the whole kitchen immediately felt more grounded. I remember standing there, sleep-deprived and extremely pregnant, just staring at it in disbelief. After all these months of planning, it was truly starting to come together.

The initial design for the range hood included cut-outs under the mantel section, but once it was up both the installer and myself agreed that it didn’t quite work right in person.

He took it back to the shop that night, redid with a streamlined look and brought it back the next morning. This is one of the many reasons I would highly recommend our installers to anyone looking to put in a new kitchen in Ontario. If there was something I wasn’t sure about or that needed tweaking, they fixed it right away.
Lower Cabinetry
For the sink side of the kitchen we kept the lower cabinets similar to what we had previously in the old kitchen. All the kitchen cabinets have a warm, creamy beige-grey called “Skipping Stone” by Benjamin Moore. It is just slightly darker than the walls and made me think of classic English country kitchens.

We also went heavy on deep drawers instead of traditional cabinet doors, and I can’t recommend that enough. They make organizing everything from pots and pans to sippy cups so much easier. We had quite a few drawers in our previous kitchen and it made me realize how much more functional they are.

On the side where the fridge was going, we decided to do something a little unconventional and make the countertop area “full size fridge depth”. Instead of the usual 24″ deep countertops, we have 32″ countertops in that area. It gave us more work surface and meant we could incorporate a small peninsula island in the doorway to the dining room.
This meant that the cabinets in that area needed to be built out farther from the wall. We only had one incident of a kid dropping toys down there during the renovation. (Can you guess who it was?) Thankfully we were able to fish them out with a magnet on a long stick.
Upper Cabinets

For the upper cabinetry, we went all the way to the ceiling to take advantage of every bit of height and give the space that custom built-in feel. The exposed sides of the cabinets also have “dummy doors” – a small upgrade that really gave it that custom look.

Above the fridge, we went with baking sheet and cutting board storage. It goes the full depth of the cabinet so we can keep our everyday pieces at the front and our off season platters, etc at the back.

Once the crown moulding was added, it completely changed the look of the room. It was one of those “finally, it’s happening” moments that made the long renovation worth it.
Dining Room Storage & Bar Area
We also added a bar area and extra storage in the dining room — a small detail that ended up being one of my favorite parts of the entire renovation.

We used the same cabinetry style for continuity, but we switched things up by painting these ones the same colour as the walls (Benjamin Moore “White Floral”). This was a recommendation from my interior designer friend Renee Frostick from Two Birds Design, that gave the room a cohesive built-in look.


When the cabinetry installer went to go add in the bar area, he had to cut into the original baseboards. It was crazy to see the old lathe exposed for the first time in over a hundred years. When he took off the 9″ tall baseboards, we discovered that they are actually made with 3 separate pieces that were hand hewn to fit together. There was also original square nails in the boards. We’ve kept everything in the basement for future baseboard repairs.

For the bar area, the goal was to have the upper part function like a china cabinet, for storing precious pieces and our nicer barware.

We added large corbels to match the one on the peninsula bar and to mimic the smaller ones that would be added to the custom range hood. These corbels also helped to anchor these pieces to look more like a built-in piece of furniture, rather than additional kitchen cabinets.

The lower cabinet is for bar storage, with a space for a beverage centre to be installed, and then a countertop to make this a functioning serving area when we entertain.
Looking back, the cabinetry phase was a huge turning point. The house started to feel like a home again, and every decision — even the ones that took forever — started paying off.

I’ll be sharing more updates soon, including countertops, hardware, and all the final finishing touches that brought this old farmhouse kitchen to life. It feels so good to finally tell the story of this space — even if it’s a few sleepless months late.
More Kitchen Renovation Blog Posts: